Page 9 of 19
Re: 1980 spider Restoration phase 2
Posted: Sun Apr 16, 2017 12:44 am
by nelsonj
Just beautiful work. Thanks for posting.
As for the breaks pads/calipers, I'm convinced that whoever designed them was actually a furniture builder moonlighting as a mechanical engineer. Cotter pins and shims - really????
Happy Resurrection Sunday all (aka Easter). He is risen!
Re: 1980 spider Restoration phase 2
Posted: Sun Apr 16, 2017 9:55 am
by klweimer
Drummond,
As always, beautiful work!
One thing you may want to check is the brake pad anti-rattle springs you are using. Somewhere around 1980 they went from the style of springs you have on your pads to a different style that installs on the top edge of the pad instead of along the side. Like these:
https://autoricambi.us/products/brake-hose-clip
I started out with the same springs you have, but found the newer style kept the pads much quieter. You really can hear the pads rattling around in their ancient calipers when going over bumps and cracks in the road. The new style is also much more challenging to install and I broke a couple trying to get them just right. I bought one set (1 spring per pad, so 4 per axle) from AR and another set from Midwest Bayless. I found the Midwest springs a bit easier to maneuver than the AR's, but YMMV.
Related question on your brake disks. Are those new or did you clean yours up? I would expect to see the disks have a more machined look on their faces, maybe its just the picture.
Kirk
Re: 1980 spider Restoration phase 2
Posted: Tue Apr 18, 2017 12:06 am
by DRUMMOND
Hi nelson
Happy Easter to you also! Thank you for your kind words.
Regarding the brakes setup and design it reminds me of the old motorcycles and their brake setups.
Hi Kirk
thanks for the info on the new type of pad springs. when I fitted them they seemed kind of weak, but I want to put nearly everything back as it was and see how it works out before I start improving or modifying.
This is how they looked before rehab
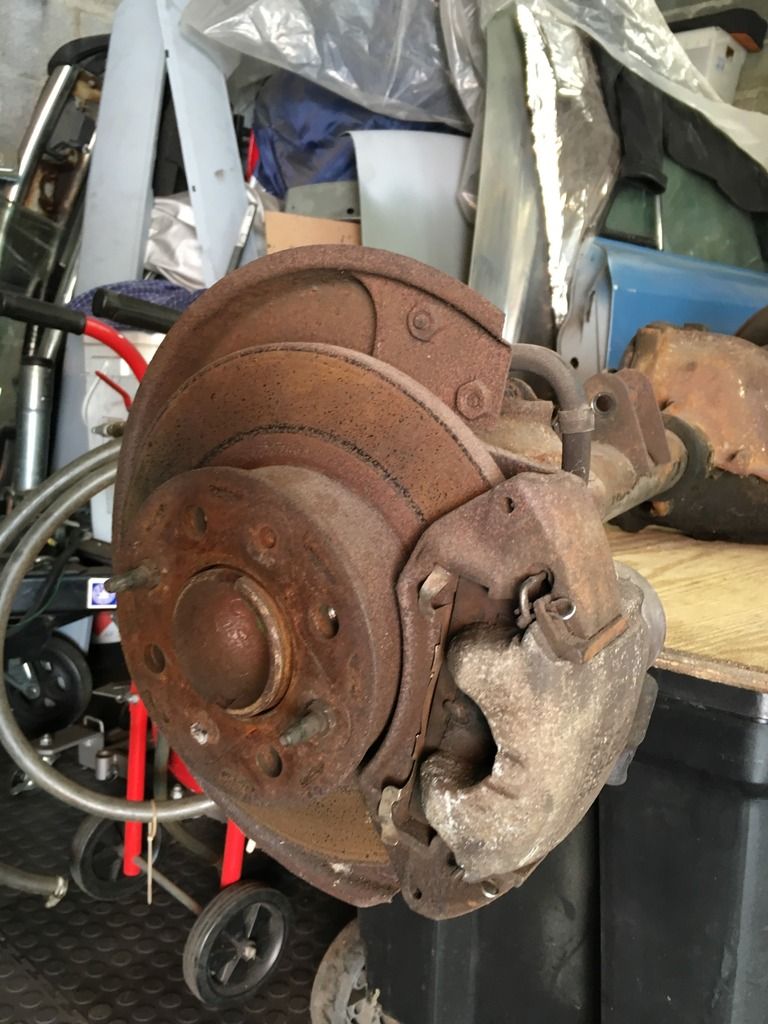
I soaked the disc in vinegar for 4 days and the rust just dissolved away, then I wire wheeled the disc. This is how it turned out, as you can see the little pockets were rust at one stage. The car is a low mileage example which had sat for a very long time, just rusting away. All of the discs have very little wear on them.
Re: 1980 spider Restoration phase 2
Posted: Tue Apr 18, 2017 8:13 am
by klweimer
Drummond,
I agree the new style springs are kind of odd, but they did work for me. I had originally put them under the pad, as opposed to on top, and that didn't work well, as they were fighting gravity all the time. The vinegar soak really cleaned up your disks! I was just concerned that the rust pitting might be hard on your new pads.
Kirk
Re: 1980 spider Restoration phase 2
Posted: Wed Apr 19, 2017 10:00 pm
by DRUMMOND
Kirk
Yes, the photo's do exaggerate the pits more than they really are. Let's hope I get to test them in the not so distant future
Re: 1980 spider Restoration phase 2
Posted: Thu Apr 20, 2017 6:29 am
by AriK
DRUMMOND wrote:Kirk
Yes, the photo's do exaggerate the pits more than they really are. Let's hope I get to test them in the not so distant future
If it concerns you just get the pad surfaces spun on a brake lathe.
Re: 1980 spider Restoration phase 2
Posted: Thu Apr 20, 2017 4:48 pm
by baltobernie
Those rotors you've salvaged are going to ruin the new pads quickly. New rotors are $18.
Re: 1980 spider Restoration phase 2
Posted: Thu Apr 20, 2017 10:35 pm
by DRUMMOND
Baltobernie/Arik
I appreciate your comments and concerns. But as I said the camera exaggerates the pits. I have no concerns.
Re: 1980 spider Restoration phase 2
Posted: Fri May 05, 2017 11:36 pm
by DRUMMOND
Re: 1980 spider Restoration phase 2
Posted: Sat May 06, 2017 2:12 pm
by klweimer
Nice looking work. As always!
Re: 1980 spider Restoration phase 2
Posted: Mon May 22, 2017 11:24 pm
by DRUMMOND
Re: 1980 spider Restoration phase 2
Posted: Tue May 23, 2017 8:01 am
by klweimer
Awesome.
Re: 1980 spider Restoration phase 2
Posted: Tue May 23, 2017 12:36 pm
by prodigalson
It's looking good! I have now decided on a "Drummond" approach to my restoration in light of this thread...I plan to replace only what absolutely needs replacing and, if possible repair, refurbish, clean, paint and lube everything else! It does help immensely that I also have a nearly complete parts car from the same year to mine replacement parts from.
Plus, I could take lessons from this thread regarding being more organized, methodical and meticulous...
Re: 1980 spider Restoration phase 2
Posted: Sun Jun 11, 2017 10:51 pm
by DRUMMOND
Re: 1980 spider Restoration phase 2
Posted: Sun Jun 11, 2017 11:02 pm
by DRUMMOND


